Listen, I get it. You’re excited to start your garden, but the weather outside is is getting frightful. You’ve got your seeds, your trays, and your grow lights ready to go. But hold up – have you thought about your soil mix?
Using the right soil is crucial for giving your seedlings the best possible start in life. And trust me, not all soil is created equal. That’s why I’m here to dish the dirt on the best soil for starting seeds indoors.
Table of Contents:
- Best Soil Mixes for Starting Seeds Indoors
- How to Make Your Own Seed Starting Mix at Home
- Factors to Consider When Choosing a Seed Starting Soil
- Techniques for Successfully Starting Seeds Indoors
- Common Mistakes to Avoid When Starting Seeds in Soil
- Transitioning Seedlings Started Indoors to Outdoor Conditions
- Conclusion
- FAQs in Relation to Best Soil for Starting Seeds Indoors
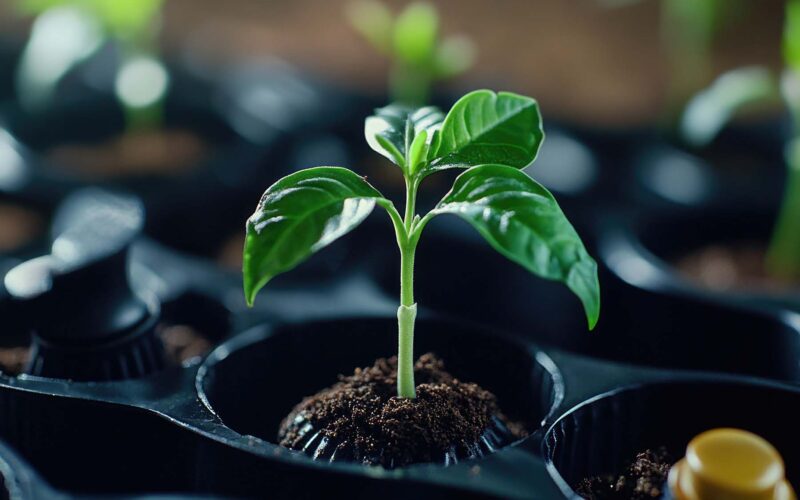
Best Soil Mixes for Starting Seeds Indoors
Starting seeds indoors is a game-changer. It gives you a head start on the growing season and lets you grow varieties you won’t find at the local nursery. But here’s the deal – you can’t just use any old potting soil . Nope, for the best results, you need a high-quality seed starting mix .
I’ve started countless seeds over the years, and I’ve learned the hard way that the soil mix makes all the difference. Skimp on the quality, and you’ll end up with weak, spindly seedlings that struggle to thrive. Invest in a premium starting mix , and watch your baby plants explode with healthy growth.
Ingredients to Look for in a Good Seed Starting Mix
So, what exactly should you look for in a seed starting mix? According to Rebecca Sears, chief green thumb at Ferry-Morse, “The ideal mixes are lightweight and fluffy so that the weight of the mix does not compact around the tender new shoots and roots.” In other words, you want a soilless mix that’s specially formulated for seedlings.
The best starting mixes typically contain a blend of peat moss, coco coir, perlite, and vermiculite. This combination provides the perfect balance of moisture retention, drainage, and aeration. It’s like giving your seeds a luxurious, five-star hotel to germinate in.
Benefits of Using a Quality Seed Starting Mix
Using a quality seed starting mix has some serious perks. First off, it gives your seeds the ideal conditions they need to germinate quickly and consistently. No more waiting around wondering if your seeds will sprout – with the right mix, they’ll pop up like clockwork.
A good starting mix also helps prevent damping off, a fungal disease that can kill your seedlings before they even get started. The light, airy texture of the mix allows for good drainage and air flow, which keeps those nasty fungal spores at bay.
Popular Brands and Products for Seed Starting Mixes
When it comes to seed starting mixes, you’ve got options. Some of my favorite brands include Ferry-Morse, Espoma, Burpee, and Miracle-Gro. They all offer high-quality, organic seed starting mixes that give reliable results.
If you’re not sure where to start, head to your local garden center and look for products specifically labeled as “seed starting mix” or “seed starter.” These pre-made blends take the guesswork out of creating your own mix, so you can focus on the fun part – watching your seeds grow.
How to Make Your Own Seed Starting Mix at Home
While there are plenty of excellent pre-made seed starting mixes on the market, I get a kick out of making my own. It’s surprisingly simple, and it lets me customize the blend to suit my needs. Plus, there’s something deeply satisfying about getting my hands dirty and crafting the perfect starting medium for my seeds.
Ingredients Needed for Homemade Seed Starting Mix
To whip up a batch of homemade seed starting mix, you’ll need a few key ingredients:
- Peat moss or coconut coir
- Perlite or vermiculite
- Compost (homemade or store-bought)
- Sand (optional)
These ingredients work together to create a starting medium that holds moisture, drains well, and allows plenty of air flow. The peat moss or coco coir acts like a sponge, absorbing water and releasing it slowly. The perlite or vermiculite keeps things light and airy, while the compost adds a touch of nutrients.
Step-by-Step Instructions for Mixing Your Own Seed Starting Soil
Ready to mix up your own seed starting soil? Here’s how:
- Start with a large container, like a bucket or a storage bin.
- Add 4 parts peat moss or coco coir.
- Add 1 part perlite or vermiculite.
- Add 1 part compost.
- If desired, add a handful of sand for extra drainage.
- Mix all the ingredients together thoroughly, breaking up any clumps.
- Moisten the mix with water until it’s damp but not soggy, like a wrung-out sponge.
And there you have it – your very own custom seed starting soil. It’s like being a soil scientist, but without the fancy degree.
Tips for Storing and Using Homemade Seed Starting Mix
Once you’ve mixed up your seed starting mix, store any unused portion in an airtight container in a cool, dry place. When you’re ready to use it, give it a good fluff with your hands to loosen it up and make sure it’s evenly moistened.
When filling your seed trays or pots, be gentle. You want to lightly tamp down the mix so it’s level, but don’t pack it too tightly. The goal is to create a cozy bed for your seeds, not a brick of soil they have to fight through.
With your homemade starting medium at the ready, you’re all set to sow your seeds and watch the magic happen. Trust me, there’s nothing quite like seeing those first tiny green shoots poking through the soil. It’s like being a proud plant parent from day one.
Key Takeaway:
Starting seeds indoors? Use a quality seed starting mix for strong, healthy growth. Look for lightweight and fluffy mixes with peat moss, coco coir, perlite, and vermiculite. Or make your own. It’s easy and lets you customize the blend. Either way, you’ll see faster germination and prevent diseases.
Factors to Consider When Choosing a Seed Starting Soil
When it comes to starting seeds indoors , the type of soil you use can make all the difference. It’s the starting point for your seedlings’ growth and development. The right seed starting mix provides the ideal conditions for germination and early growth. But with so many options out there, how do you choose? Here are the key factors I consider when selecting a seed starting soil.
Importance of Moisture Retention in Seed Starting Soil
One of the most crucial aspects of a good seed starting mix is its ability to retain moisture. Seeds need consistent moisture to germinate and develop into healthy seedlings. I’ve found that mixes containing ingredients like peat moss, coco coir, or compost tend to hold moisture well. They create a hospitable environment for seeds to sprout and grow. At the same time, the mix shouldn’t stay too soggy. Oversaturated soil can lead to damping off, a fungal disease that kills seedlings. I always check the soil moisture regularly and adjust my watering accordingly.
Role of Soil Temperature in Seed Germination
Another factor that’s often overlooked is soil temperature. Seeds have specific temperature ranges for optimal germination. For example, warm-season crops like tomatoes and peppers germinate best when the soil is between 75-85°F. Cool-season crops like lettuce and kale prefer temperatures around 55-70°F. Using a seed starting mix that’s at the right temperature can make a big difference in germination rates. I’ve had great success using seedling heat mats to warm up the soil for heat-loving crops during the seed starting season.
Nutrient Requirements for Young Seedlings
While seeds contain enough nutrients to support initial growth, seedlings will eventually need additional nutrients from the soil. However, seed starting mixes are typically low in nutrients. This is because excessive nutrients can actually harm delicate seedlings. I prefer to use a mix with just enough nutrients to support early growth. Once the seedlings develop their first true leaves, I start applying a dilute fertilizer solution to provide the necessary nutrients. Some mixes contain a small amount of slow-release fertilizer, which can be convenient. Just be careful not to overdo it, as too much fertilizer can burn the tender roots.
Techniques for Successfully Starting Seeds Indoors
Over the years, I’ve learned that successfully starting seeds indoors requires more than just the right soil. It’s a combination of several key techniques. From preparing your containers to providing the right environment, each step plays a crucial role. Here are some of the most important techniques I’ve found for starting seeds indoors.
Preparing Containers and Trays for Seed Starting
Before you even start seeds indoors, it’s essential to properly prepare your containers and trays. I always make sure to clean and disinfect them thoroughly. This helps prevent any lingering diseases or pests from infecting your new seedlings. You can use a dilute bleach solution or hydrogen peroxide to sterilize your containers. I also make sure the containers have adequate drainage holes. Proper drainage is key to preventing oversaturated soil, which can lead to root rot and other issues.
Proper Depth and Spacing for Sowing Seeds
When it comes time to sow seeds, pay close attention to the recommended depth and spacing for each variety. As a general rule, sowing seeds too deeply can hinder germination. Most seeds should be planted at a depth of about 2-3 times their diameter. Spacing is also important to prevent overcrowding. Crowded seedlings compete for resources and are more prone to disease. I always refer to the seed packet for specific spacing guidelines.
Maintaining Optimal Moisture Levels for Germination
Keeping the soil consistently moist (but not waterlogged) is crucial for successful germination. I’ve found that using a spray bottle or fine mist to water newly sown seeds helps prevent disturbance. Once the seeds sprout, I switch to bottom watering. This involves setting the tray in a shallow pan of water and allowing the soil to absorb moisture from the bottom up. It prevents overwatering and keeps the foliage dry, reducing the risk of disease. I also like to cover my seed trays with plastic domes or wrap to maintain humidity. Just be sure to remove the cover as soon as the seeds germinate to prevent damping off.
Providing Adequate Light and Warmth for Seedlings
Insufficient light is one of the most common reasons for leggy, weak seedlings. I’ve learned that providing 12-16 hours of bright, direct light is essential for healthy growth. I use adjustable grow lights positioned just a few inches above the seedlings. This provides the intense light they need without causing heat damage. In addition to light, consistent warmth is crucial, especially for heat-loving crops. I use seedling heat mats to maintain a soil temperature between 70-80°F for the best results. Remember, the seed starting process is all about providing the optimal environment for your seeds to thrive. With the right techniques and attention to detail, you’ll be well on your way to a bountiful garden.
Key Takeaway:
Choosing the right seed starting soil is key to growing healthy seedlings indoors. Look for a mix that retains moisture but isn’t too soggy, has the right temperature for germination, and contains just enough nutrients. Don’t forget to prepare your containers properly, sow seeds at the correct depth and spacing, maintain optimal moisture levels with careful watering techniques, and provide plenty of light and warmth.
Common Mistakes to Avoid When Starting Seeds in Soil
Starting seeds indoors can be a game-changer for your garden. But let’s be real, it’s not always smooth sailing. I’ve made my fair share of mistakes over the years. And I’ve learned the hard way that even small missteps can lead to big problems down the line.
Overwatering or Underwatering Seedlings
One of the most common mistakes when starting seeds is overwatering or underwatering. It’s a delicate balance, and getting it wrong can spell disaster for your little seedlings. Overwatering can lead to damping off, a fungal disease that causes seedlings to collapse and die. I’ve lost entire seed trays to this heartbreaking issue. The key is to keep the soil moist but not soggy. On the flip side, underwatering can cause your seedlings to wilt and stunt their growth. I’ve found that using plastic covers or domes can help maintain consistent moisture, but be sure to remove them once the seeds sprout to prevent fungal growth.
Using Old or Contaminated Seed Starting Mix
Another mistake I’ve made is using old or contaminated seed starting mix. It’s tempting to save a few bucks and reuse last year’s mix, but trust me, it’s not worth the risk. Old mix can harbor disease spores and fungus that can wreak havoc on your delicate seedlings. I learned this lesson the hard way when I lost an entire batch of tomatoes to a mystery fungus. Now, I always start with fresh, sterile seed starting mix each season. It’s a small investment that pays off big time in healthy, thriving plants.
Failing to Provide Enough Light or Warmth
Seedlings need a lot of light to grow strong and healthy. I’ve made the mistake of placing my seed starting trays in a window, thinking that would be enough. But the truth is, most windows don’t provide nearly enough light for optimal growth. Insufficient light leads to weak, leggy seedlings that struggle to survive.
I’ve found that using grow lights is the best way to ensure your seedlings get the light they need. Position the lights just a few inches above the trays and keep them on for 12-16 hours per day. Warmth is also crucial for germination and growth. Most seeds germinate best at soil temperatures between 65-75°F. I use heat mats to maintain consistent warmth, especially for heat-loving crops like peppers and tomatoes.
Transitioning Seedlings Started Indoors to Outdoor Conditions
You’ve nurtured your seedlings indoors, and now it’s time to move them out into the big, wide world. But hold up. You can’t just plop those pampered babies into the ground and expect them to thrive. Transitioning seedlings from indoors to outdoors requires a bit of finesse. Trust me, I’ve learned this lesson the hard way.
Hardening Off Seedlings Before Transplanting Outdoors
One year, I was so excited to get my tomatoes in the ground that I skipped the hardening off process. I took them straight from the cozy indoors to the harsh reality of the garden. And boy, did they suffer. Hardening off is the process of gradually acclimating your seedlings to outdoor conditions. It’s like sending them to boot camp before deployment. Start by placing your seedlings outside in a sheltered spot for a few hours a day. Gradually increase their outdoor time and exposure to sun and wind over the course of a week or two. This helps them build up the strength and resilience they’ll need to survive and thrive in the garden.
Choosing the Right Time to Transplant Based on Weather and Plant Maturity
Timing is everything when it comes to transplanting. I’ve made the mistake of putting my seedlings out too early, only to have them decimated by a late frost. Heartbreaking. Pay close attention to your local weather forecast and average last frost date. Most seedlings should be transplanted outdoors after the risk of frost has passed and the soil has warmed up. Plant maturity is also a factor. Most seedlings are ready to brave the great outdoors after 4-6 weeks of indoor growth. They should have several sets of true leaves and a robust root system.
Preparing Garden Beds or Containers for Transplanting
Before you transplant, take the time to properly prepare your garden beds or containers. I’ve made the mistake of rushing this step, and it always comes back to bite me. Make sure your soil is rich, well-draining, and amended with plenty of organic matter. I like to work in aged compost or well-rotted manure a few weeks before transplanting. This gives the soil time to settle and the nutrients to integrate.
If you’re using containers, choose ones with adequate drainage holes and fill them with a high-quality potting mix. Don’t skimp on the soil – your plants will thank you later. With a little patience and preparation, your indoor-grown seedlings will make a smooth transition to the great outdoors. Before you know it, they’ll be thriving in your organic garden, ready to take on the world and produce a bountiful harvest.
Key Takeaway:
Starting seeds indoors? Make sure to keep soil moist, not soggy, and avoid old seed mix. Give them plenty of light and warmth, gradually acclimate them outdoors, and prep your garden beds well. These steps lead to strong plants ready for a thriving garden.
Conclusion
So there you have it, folks! Now you have the lowdown on the best soil for starting seeds indoors. It’s not rocket science, but it does make a world of difference for your little garden babies.
Remember, a quality seed starting mix is lightweight, fluffy, and packed with the right nutrients to support healthy growth. Whether you opt for a store-bought mix or DIY your own, giving your seeds the perfect environment is the key to a bountiful garden down the line.
Now that you’re armed with this knowledge, you’re ready to get growing. Sow those seeds, tend to those seedlings, and watch your garden dreams take root. Happy planting!
FAQs in Relation to Best Soil for Starting Seeds Indoors
What is the best soil mix for starting seeds indoors?
A lightweight, sterile seed starting mix with peat moss or coco coir ensures strong root growth and prevents disease.
What type of soil is best for seed germination?
Loose, well-draining soil rich in organic matter but low in nutrients works wonders for most seeds’ early days.
Is it OK to start seeds in potting soil?
You can use potting soil if it’s light and fluffy. But specialized seed mixes offer better results overall.
Can I use Miracle-Gro potting soil to start seeds?
Miracle-Gro potting soil can be used, but ensure it’s labeled specifically for seeding as its nutrient levels vary.